Stencil Art Walls: Paint Your Personality
Why Stencil Art Walls Are Taking Over DIY Decor
A stencil art wall is a painted wall design created using reusable templates to apply patterns, images, or text directly onto your surface. Here’s what you need to know:
Quick Facts:
- Cost: $50-100 vs. hundreds for wallpaper
- Time: 14 hours average for full room
- Materials: Mylar stencils, latex paint, foam roller
- Durability: Reusable templates, washable results
- Skill Level: Beginner-friendly with practice
Benefits over wallpaper:
- No wall damage or residue
- Unlimited color choices
- Reusable for multiple rooms
- Easy touch-ups and changes
The DIY trend has exploded because stencil art walls give you complete creative control without the commitment or cost of wallpaper. You can create the look of expensive designer patterns for a fraction of the price, and if you get tired of it, just paint over it.
One DIY enthusiast shared: “The hardest thing about this isn’t stencilingit’s choosing the design and colors!” That’s the beauty of stencil art - the possibilities are endless.
I’m Chris Higgins, a trained graphic artist who’s spent over a decade creating bold, original designs that blend illustration with street art influences. My experience with stencil art wall techniques comes from years of translating complex visual concepts into simple, achievable DIY projects that let your personality shine through your space.
Why Wall Stenciling Beats Wallpaper & Decals
Let’s be real here - we’ve all had that moment. You’re scrolling through Pinterest, fall head-over-heels for some gorgeous wallpaper pattern, then click the price and nearly choke on your coffee. Or maybe you’ve tried those trendy wall decals, only to watch them slowly peel off like sad, expensive stickers.
Stencil art walls are the game-changer you’ve been waiting for. They solve every frustrating problem with traditional wall treatments while giving you something wallpaper and decals simply can’t: complete creative control over your space.
Your wallet will thank you. While designer wallpaper can easily run $200-800 for a single room, quality stencils typically cost just $10-80. That’s not a typo - you really can transform an entire wall for the price of a nice dinner out. And here’s the kicker: that same stencil can be used again and again, making it incredibly cost-effective for multiple rooms or future projects.
Color freedom is where stencils really shine. With wallpaper, you’re stuck with whatever color the designer chose. Need that perfect shade of dusty rose to match your vintage mirror? Too bad. But with stencils, you pick any paint color your heart desires. Want to create an ombré effect? Go for it. Need to match your existing décor perfectly? Easy peasy.
No more wall damage nightmares. If you’ve ever removed wallpaper, you know the horror - chunks of drywall coming off, hours of steaming and scraping, sometimes needing to repaint the entire wall anyway. Wall decals aren’t much better, leaving behind sticky residue that seems impossible to clean. A stencil art wall? When you’re ready for something new, just paint right over it. No drama, no damage, no expensive repairs.
You’re also making an eco-friendly choice. Reusable stencils mean way less waste compared to single-use wallpaper or decals that end up in landfills. Plus, you can choose low-VOC paints for better indoor air quality - something your family and pets will appreciate.
Stencils vs Wallpaper vs Decals: Quick Breakdown
| Feature | Stencils | Wallpaper | Wall Decals |
|---|---|---|---|
| Cost | $10-80 | $200-800+ | $20-100 |
| Reusability | Unlimited | One-time use | One-time use |
| Color Options | Unlimited | Fixed | Fixed |
| Wall Damage | None | High risk | Residue risk |
| Durability | Permanent paint | 5-10 years | 1-3 years |
| Customization | Complete | Limited | None |
| Removal | Paint over | Difficult | Moderate |
The bottom line? Stencils give you low commitment with high impact. You get the custom look of expensive designer treatments without the permanent commitment or hefty price tag. Whether you’re a renter who can’t make major changes or a homeowner who loves switching up your style, stencil art walls offer the perfect solution for creating spaces that truly reflect your personality.
Planning Your Stencil Art Wall
Creating a stunning stencil art wall starts long before you pick up a brush. The secret to professional-looking results? Taking time to plan properly. Trust me, I’ve seen too many enthusiastic DIYers jump straight into stenciling, only to step back and realize their pattern is crooked or their spacing is off.
Think of planning as your foundation. Just like we wouldn’t start a painting without sketching first, your stencil project needs thoughtful preparation to shine.
Understanding Your Materials
Most quality stencils are made from 10-mil Mylar - that’s actually thinner than a business card but incredibly durable. This flexible material bends beautifully around corners and edges while staying strong enough for countless uses. The laser-cut precision gives you those crisp, clean lines that make people ask “Is that wallpaper?”
Getting Your Measurements Right
Here’s where many projects go sideways. Measure your wall space carefully, noting the height and width plus any obstacles like outlets, switches, or trim work. Look for natural starting points like corners or the center of your wall. Consider how your pattern repeats - some designs need specific spacing to look balanced.
Registration Marks Save the Day
Quality stencils include small registration marks - those little alignment guides that help position repeating patterns perfectly. These tiny marks are absolute lifesavers for maintaining consistent spacing across your entire wall. Without them, even the steadiest hand can create a wonky pattern.
For more creative inspiration and fresh design ideas, check out our blog where we share the latest trends and techniques from our Key West studio.
Choosing the Perfect Stencil Design
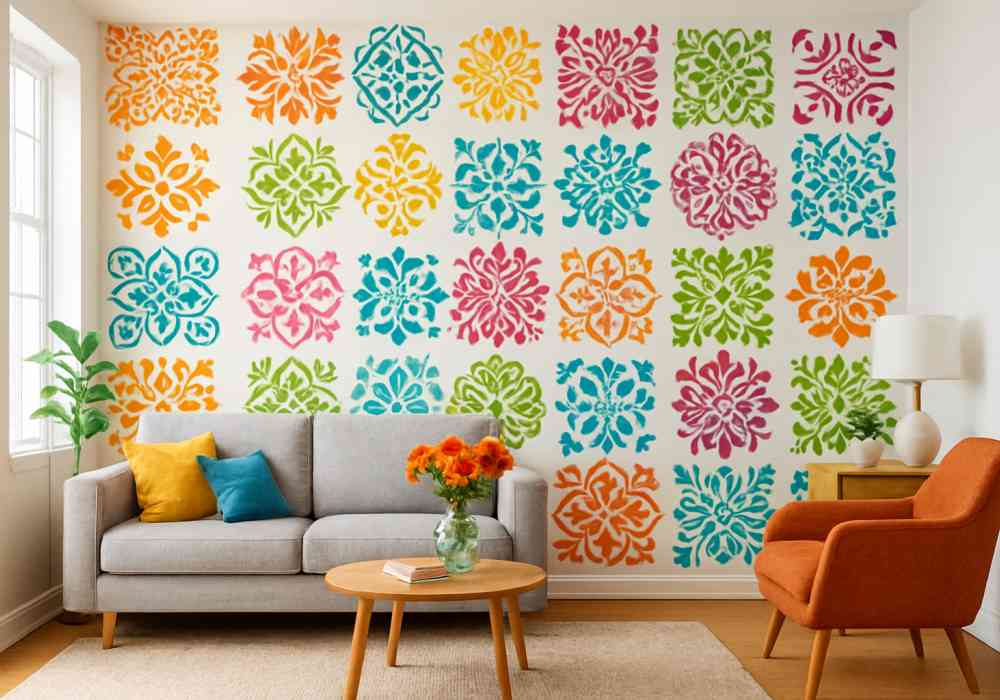
The variety of stencil designs available today is honestly mind-blowing. Here’s what we’re seeing trending in 2024, and what works best in different spaces.
Geometric patterns bring that clean, modern vibe with hexagons, triangles, and abstract shapes. They add visual interest without overwhelming your room - perfect for contemporary spaces that need just a touch of personality.
Damask and traditional patterns never go out of style. These classic European motifs bring instant elegance and sophistication, especially in formal dining rooms or master bedrooms where you want that timeless feel.
The chinoiserie trend continues strong with delicate branches, birds, and floral motifs inspired by Asian art. These designs create such a serene, sophisticated atmosphere - we’ve used them in several client projects with beautiful results.
Boho and tribal patterns are perfect for creating that relaxed, worldly vibe everyone’s after. Moroccan patterns, mandala designs, and tribal motifs work especially well as accent walls behind beds or in reading nooks.
Floral and nature patterns are having a major moment thanks to the Grandmillenial trend. From delicate cherry blossoms to bold tropical leaves, nature-inspired stencils bring life and energy to any space.
Scale matters more than you think. Large patterns with 24-inch or bigger repeats work best in spacious rooms with high ceilings. Medium patterns between 12-24 inches are versatile for most standard rooms. Small patterns under 12 inches are perfect for powder rooms or as decorative borders.
Picking Paints & Tools for a Crisp Stencil Art Wall
After years of experimenting with different combinations, I can tell you the right tools make all the difference between amateur and professional results.
Paint selection is crucial. Flat latex paint works best for both base coats and stenciling because it dries quickly, has minimal odor, and provides excellent coverage. Skip the glossy finishes - they cause paint to slide under stencil edges, creating those fuzzy lines nobody wants.
If you’re concerned about indoor air quality (and you should be), choose water-based paints with low VOCs for the safest option.
Your essential tool kit should include a high-density foam roller for smooth, even coverage and a stencil brush for detail work and corners. Blue painter’s tape with low-tack adhesive won’t damage your walls, while repositionable spray adhesive gives you ultra-crisp edges. Don’t forget paper towels for offloading excess paint, a level for straight alignment, and a pencil for marking guidelines.
Here’s a pro tip that’s saved countless projects: always test your paint and technique on a foam board painted the same color as your wall. This lets you perfect your technique and see how colors work together before committing to the actual wall. It takes an extra hour but prevents days of regret.
Step-by-Step: Creating a Show-Stopping Stencil Art Wall
Here’s where the magic happens! After years of helping people transform their spaces, I’ve learned that success comes down to patience and proper technique. Don’t worry if you’re nervous - creating a stencil art wall is much more forgiving than you might think.
The key is working methodically and not rushing the process. Your wall didn’t get boring overnight, and it doesn’t need to be transformed in one either. Take your time, and you’ll be amazed at what you can achieve.
Preparing the Surface & Layout
Start with a clean slate - literally. Your wall needs to be clean and smooth for the best results. Fill any nail holes or imperfections with spackling compound and sand them smooth once dry. This might seem tedious, but those little bumps will show through your beautiful stencil work if you skip this step.
Apply your base coat using a high-quality roller, working in smooth, even strokes. Two thin coats always beat one thick coat. Let it cure completely - and yes, that means waiting a full 24 hours. I know it’s tempting to rush, but proper curing prevents your stencil from pulling up fresh paint.
Create your guideline by measuring down from the ceiling at several points. Most ceilings aren’t perfectly level (even in new homes), so measuring at multiple spots ensures your pattern stays straight. Draw a light pencil line using a straightedge - this becomes your roadmap for perfect alignment.
Practice on a test board first - trust me on this one. Paint a piece of foam board the same color as your wall and run through the entire stenciling process. This lets you perfect your pressure, paint amount, and timing without any pressure. Plus, you’ll have a sample to show off later!
Applying the Stencil Art Wall Pattern
Position your stencil carefully along your guideline. For repeating patterns, starting at the center of your wall and working outward creates the most balanced look. Secure it with blue painter’s tape - the low-tack adhesive won’t damage your fresh paint.
Load your foam roller with paint, then here’s the crucial part: offload the excess on paper towels until the roller feels almost dry. This feels wrong at first - you’ll think there’s not enough paint. But minimal paint is your secret weapon against bleeding under the stencil edges.
Apply thin coats using light to medium pressure. Roll from the outside edges of each cutout toward the center. Let the paint build up gradually over two or three passes rather than trying to get full coverage immediately. Your patience here makes the difference between amateur and professional results.
Use the stagger method to stay productive. While one section dries, position your stencil for the next area. This keeps you moving while ensuring each section has proper drying time before you remove the stencil.
Corners, Edges & Tricky Spots
Inside corners require a simple trick: score the back of your stencil at your corner measurement, then fold it carefully. The flexible Mylar material handles this beautifully without cracking.
Outside corners work similarly, but score the front face instead. This creates a clean fold that hugs the corner perfectly and maintains your pattern integrity.
Working around trim gets a bit creative. You might need to trim your stencil or switch to a smaller brush for tight spaces around baseboards or outlets. Don’t stress about perfection here - minor irregularities actually add to the handcrafted charm.
Ceiling work can extend your pattern all the way up for dramatic impact. Consider getting a ceiling-specific stencil that creates a clean finishing edge at the top.
Cleaning, Reusing & Storing Your Stencils
Clean between uses to maintain those crisp lines you’ve worked so hard to achieve. For water-based paints, soak your stencil in warm water with mild soap for five minutes, then wipe clean with a soft cloth. Don’t let paint dry on your stencil - it becomes much harder to remove later.
Store your stencils flat in a dust-free bin or container. The 10-mil Mylar material is incredibly durable, but folding or creasing can damage the edges. Proper storage means your stencils will be ready for your next room or to share with friends.
Quality stencils last for years with proper care. We’ve had customers use the same stencil for multiple rooms throughout their home, and even pass them along to family members. This reusability is what makes creating a stencil art wall such a smart investment in your home’s style.
Beyond Walls: Creative Stencil Projects & Pro Tips
Here’s where things get really exciting - once you’ve conquered your first stencil art wall, you’ll start seeing possibilities everywhere! We’ve been amazed by what our clients create once they catch the stenciling bug.
Transform Tired Furniture That old dresser gathering dust in your garage? Perfect candidate for a stencil makeover. We’ve seen people turn boring furniture into stunning statement pieces with the right pattern choice. The trick is matching the stencil scale to your furniture size - delicate patterns work beautifully on smaller pieces, while bold geometric designs can handle larger surfaces like tabletops or headboards.
Tables, chairs, and even lampshades become conversation starters with thoughtful stenciling. One client told us her stenciled nightstand gets more compliments than any expensive piece she owns.
Floor Drama That Won’t Break the Bank Want the look of expensive ceramic tiles? Floor stenciling creates incredible impact for pennies on the dollar. Concrete patios transform into Mediterranean terraces, while plain wood floors can mimic intricate parquet patterns.
The key is proper surface prep and using the right sealers to protect your work. It takes patience, but the results are absolutely worth it.
Fabric and Soft Goods Coordinating your stencil art wall with curtains, pillows, and table runners creates a pulled-together designer look. Fabric paint works wonderfully for this - just follow the heat-setting instructions so your designs last through washing.
Don’t Forget the Fifth Wall Ceiling stencils add incredible drama, especially in smaller spaces like powder rooms where you want maximum impact. The intimate feeling they create in bedrooms is particularly cozy and romantic.
Advanced Techniques to Try Once you’re comfortable with basic stenciling, ombré effects create sophisticated color gradations that look professionally done. Metallic accents add instant glamour - a touch of gold or silver can lift any pattern from pretty to stunning.
Layered patterns are where our street art background really comes in handy. Combining multiple stencils creates complex, custom designs that nobody else will have. The best results often come from unexpected color combinations and bold choices.
Time & Cost Expectations
Let’s be realistic about what you’re getting into. A full stencil art wall project typically takes 14 hours for beginners, but don’t try to rush through it in one weekend. Spread the work over several days to allow proper drying time between steps.
Here’s how those hours break down: 2 hours for planning and prep (this time is crucial - don’t skip it), 8-10 hours for actual stenciling (depending on pattern complexity), and 2-4 hours for touch-ups and cleanup.
Budget-wise, expect to spend $50-100 for a complete room change. Your stencil costs $10-80 depending on size and complexity, paint runs $15-30, and tools are a $20-40 one-time investment. Miscellaneous supplies like tape and paper towels add another $5-15.
The beautiful thing about stenciling is that it’s absolutely beginner-friendly. You don’t need artistic talent or years of experience. The learning curve is gentle, and mistakes are easily painted over. Most people are genuinely surprised by how professional their first attempt looks.
Common Mistakes & How to Avoid Them
We’ve seen every mistake in the book, and the good news is they’re all preventable with the right knowledge.
Paint bleed is the biggest frustration for new stencilers. Those fuzzy, imperfect edges happen when paint seeps under the stencil. Prevent this by using minimal paint on your roller - it should feel almost dry. Secure your stencil properly with tape or adhesive, and always roll from the edges toward the center of each cutout. Build coverage gradually with multiple thin coats rather than trying to get perfect coverage in one pass.
Pattern misalignment ruins the professional look you’re going for. Those registration marks aren’t suggestions - use them religiously. Check your alignment every few placements with a level, and make small adjustments as needed. It’s much easier to fix alignment issues early than to redo an entire wall.
Heavy-handed application is another rookie mistake. We get it - you want to see results quickly. But light pressure and thin coats always win over trying to load on paint. Think of it like building layers - each pass adds to the previous one.
Rushing the drying process leads to smudges and imperfect edges every time. Plan your project timeline to allow proper drying between coats and before removing stencils. Your patience will be rewarded with crisp, clean lines that look professionally done.
The best advice we can give? Practice on that foam board first, take your time, and enjoy the process. Creating a stencil art wall should be fun, not stressful.
Frequently Asked Questions about Stencil Art Wall Projects
Let’s tackle the questions we hear most often from DIYers ready to dive into their first stencil art wall project. After years of helping people transform their spaces, these are the concerns that come up again and again.
How long does a stencil art wall take?
Here’s the honest truth - a typical stencil art wall takes about 14 hours total, but don’t let that number scare you! You’re not doing this all at once. Most people spread their project over 3-4 relaxing days:
Day 1 gets you started with planning, prep work, and applying your base coat. This is actually the most important day - good prep work makes everything else easier.
Days 2-3 are where the magic happens with the actual stenciling. Work in comfortable sections, take breaks, and enjoy watching your wall transform. There’s something incredibly satisfying about seeing the pattern come together.
Day 4 is for touch-ups and stepping back to admire your handiwork. This is often when people start planning their next stencil project!
The beauty of stenciling is you’re not racing against time like you would be with wallpaper paste. Take breaks, step back, and enjoy the process.
Are wall stencils suitable for beginners?
Absolutely! Stenciling is one of the most beginner-friendly DIY techniques we recommend. Unlike other decorating methods where mistakes can be costly disasters, stenciling is incredibly forgiving.
Make a mistake? Just paint over it and try again. The paint dries quickly, so you’re never stuck with an error for long. Most beginners are amazed at how professional their results look, even on their first attempt.
We always tell our clients: “The hardest part isn’t the stenciling - it’s choosing the design and colors!” Once you start rolling that first section, you’ll quickly get into a rhythm. The technique is simple, but the results look like you hired a professional.
Start with a simple geometric pattern if you’re nervous. These are the most forgiving and give you confidence to tackle more complex designs later.
Where can I share my completed stencil art wall?
This is one of our favorite questions because it means someone’s proud of their work! Social media is perfect for showing off your stencil art wall creations. Instagram and Pinterest are especially popular for home decor projects.
Many stencil companies love featuring customer projects on their websites and social channels. It’s free advertising for them and recognition for you - a win-win situation.
Consider entering before-and-after contests too. Some home improvement sites and manufacturers offer prizes up to $100 for the best room changes. Your stencil project could literally pay for itself!
Document your process with photos as you go. People love seeing the change from blank wall to stunning focal point. Those progress shots often get more engagement than just the final result.
The DIY community is incredibly supportive, so don’t be shy about sharing your work. You’ll inspire others to try their own stencil projects!
Conclusion
There’s something magical about stepping back and seeing your stencil art wall come together for the first time. After years of helping people transform their spaces at Handshucked Art and Designs, I still get excited watching that moment when someone realizes they’ve created something truly beautiful with their own hands.
Your stencil art wall project is more than just a decorating decision - it’s a statement about who you are and how you want to live in your space. Whether you chose bold geometric patterns that energize your morning routine or delicate florals that help you unwind at night, you’ve painted your personality directly onto your walls.
The best part? You did it yourself. No expensive contractors, no waiting for installation appointments, no settling for colors that are “close enough.” Just you, your creativity, and the satisfaction that comes from making something beautiful happen.
Release your creativity and start planning your first project today. From our Key West studio, we’ve seen how one successful stencil project often leads to another, then another. Before you know it, you’re looking at furniture, floors, and even ceilings with fresh eyes, wondering what patterns might work there too.
The walls in your home have been waiting patiently for you to tell your story. They’ve watched you live, laugh, and make memories. Now it’s time to give them a voice that reflects all the beauty and creativity that lives inside you.
Ready to get started? Visit our Key West Studio Shop for inspiration, tools, and everything you need to begin your stenciling trip. Your first stencil art wall is just a pattern and some paint away from becoming reality.
What story will your walls tell?