Stencil Art Starter Pack: Your First Steps to Creative Fun
Why Stencil Art for Beginners is the Perfect Creative Starting Point

Stencil art for beginners offers one of the most accessible entry points into the art world, requiring only basic supplies and delivering instant, satisfying results. According to stenciling experts, this ancient technique - dating back 35,000 years - can be mastered by anyone in a single weekend project.
Quick Start Guide for Stencil Art Beginners:
• Materials needed: Stencil, paint, brush/sponge, tape, paper
• Time required: 30 minutes for simple projects
• Cost: Under $20 to get started
• Skill level: No prior art experience needed
• Best first project: Single-color design on paper or canvas
As one tutorial creator perfectly captured it: “You can be a terrible artist, and it will still come out well.” This forgiving medium accepts small imperfections as part of its handcrafted charm, making it ideal for stress relief and therapeutic creativity.
The beauty of stenciling lies in its repeatability - once you master the basic “offload and dab” technique, you can create consistent, professional-looking designs on everything from walls to T-shirts. Popular online courses report that over 90% of beginners learn new techniques even without prior stenciling experience.
I’m Chris Higgins, a trained graphic artist who’s spent over a decade combining bold illustration with graffiti and pop art elements through my work at Handshucked Designs. My experience with stencil art for beginners has shown me that this technique bridges the gap between commercial design and accessible DIY creativity, making it perfect for anyone wanting to create authentic, handcrafted art. Let’s explore everything you need to know to start your stenciling journey today.
Why Start Stenciling?
Starting with stencil art offers three compelling advantages that make it perfect for creative beginners:
Low Cost Entry Point: Unlike many art forms that require expensive equipment, stenciling can begin with items you likely already have at home. A basic stencil, some acrylic paint, and a brush or sponge are all you need to create your first piece. Most starter projects cost under $20, making it one of the most budget-friendly ways to explore your artistic side. Compare this to oil painting, which requires canvases, multiple brushes, expensive paints, solvents, and proper ventilation - easily $100+ to start properly. Stenciling democratizes art creation by removing financial barriers that prevent many people from exploring their creativity.
Instant Results: There’s something deeply satisfying about lifting a stencil to reveal a crisp, clean design underneath. Unlike painting or drawing that requires years to master, stenciling delivers professional-looking results from your very first attempt. This immediate gratification keeps motivation high and builds confidence quickly. The psychological impact of early success cannot be overstated - when you see that first perfect design emerge, it triggers a creative confidence that encourages you to tackle more ambitious projects. Many beginners report feeling “addicted” to that moment of revelation when they peel away the stencil.
Stress Relief and Therapeutic Benefits: The repetitive dabbing motion and focus required for stenciling creates a meditative state that many find deeply relaxing. As one practitioner noted, it’s “therapeutic art” that helps you disconnect from daily stresses while creating something beautiful. The forgiving nature of the medium means you can let go of perfectionism and simply enjoy the process. Art therapists often recommend stenciling for anxiety management because it provides structure (the stencil guides your work) while still allowing creative expression. The bilateral hand movements involved in dabbing paint also activate both brain hemispheres, promoting a calm, focused mental state similar to meditation.
The Basics: What Is Stencil Art & Why It Rocks

Imagine creating perfect, crisp designs every single time - that’s the magic of stencil art for beginners. At its heart, stenciling is beautifully simple: you place a cut-out template over any surface and apply paint through the openings. The stencil acts like a selective mask, letting paint reach only where you want it while blocking everything else.
Every stencil has two essential parts that work together. The islands are the cut-out areas where paint flows through to create your design. The bridges are the connecting strips that hold everything together and keep your stencil from falling apart. Understanding this relationship helps you see why some designs translate perfectly to stencils while others need creative adjustments.
Here’s something that might blow your mind: stenciling has a 35,000-year history, making it one of humanity’s oldest art forms. Those ancient cave painters in Argentina weren’t just randomly splattering paint on walls - they were using bamboo and banana leaves as natural stencils to create hand prints and animal silhouettes. From those prehistoric caves to modern street art, this technique has never gone out of style.
What makes stenciling truly special is how it plays with negative space. The areas where paint doesn’t go become just as important as where it does. This creates those bold, graphic images that grab your attention from across the room. Plus, the repeatability factor means once you nail a design, you can recreate it perfectly whether you’re making one piece or a hundred.
The evolution of stenciling through history reveals fascinating cultural connections. Ancient Egyptians used stencils for tomb decorations, Japanese artisans perfected katazome fabric stenciling techniques over 1,000 years ago, and European churches employed stencils for consistent religious iconography. During the Industrial Revolution, stenciling became essential for mass production labeling and signage. This rich heritage means when you pick up a stencil brush today, you’re participating in an unbroken chain of human creativity spanning millennia.
How Does Stenciling Work?
The science behind stenciling is refreshingly straightforward - it’s all about paint pass-through. Your stencil becomes a selective barrier that only lets paint reach specific spots on your surface. When you dab or roll paint over the template, it travels through the cut-outs to create your design underneath.
Here’s where things get interesting: masks work opposite to stencils. A traditional stencil has the design cut out, so paint goes through to create the positive image. A mask covers the design area while you paint around it, leaving that covered spot untouched. Both techniques are incredibly useful, and many artists combine them for complex projects.
Single-color stenciling is perfect when you’re starting out. One stencil, one paint color, and you’re creating clean, high-contrast designs that look professionally made. Multi-layer stenciling sounds intimidating, but it’s really just single-color work repeated with different stencils and colors. Each layer adds another element to build up more detailed, colorful images.
The physics of paint application becomes crucial for success. Paint viscosity affects how it flows through stencil openings - too thin and it bleeds under edges, too thick and it won’t penetrate properly. Surface tension plays a role too; smooth surfaces like glass require different techniques than porous materials like fabric or wood. Understanding these principles helps you adjust your approach for different materials and achieve consistent results.
Key Types of Stencils
Mylar sheets are the workhorses of the stenciling world. This tough plastic material survives countless uses, cleans up easily with soap and water, and gives you those razor-sharp edges that make designs pop. Most experienced stencilers swear by mylar for its durability and precision. The material was originally developed for industrial applications, which explains its incredible toughness and chemical resistance.
Adhesive friskets take precision to the next level. These stencils have sticky backs that bond directly to your surface, eliminating any chance of paint bleeding under edges. They’re fantastic for intricate details, though you’ll typically get just one use out of them. Professional sign painters often use frisket film for lettering work where absolute precision is non-negotiable.
Layering sets are like puzzle pieces designed to work together. Each stencil in the set adds a different color or design element, building up to create complex, multi-colored artwork. They include registration marks - little alignment guides that help you position each layer perfectly on top of the previous one. These sets can create artwork that rivals hand-painted pieces in complexity and visual impact.
Alphabet masks and letter stencils open up a whole world of text possibilities. Whether you’re creating custom signs, adding quotes to wall art, or labeling storage boxes, having a good set of letters in different fonts and sizes makes your projects look polished and professional. Typography stencils range from simple block letters perfect for beginners to elaborate script fonts that challenge even experienced artists.
Must-Have Tools & Materials for First-Time Stencilers
Getting started with stencil art for beginners doesn’t mean breaking the bank, but having the right tools in your corner makes the difference between frustration and that satisfying “wow, I made this!” moment. Think of it like cooking - you can make a great meal with basic tools, but the right knife makes everything easier.
Let’s start with the cutting essentials. Mylar sheets in the 7-10 mil thickness range are your best friend for creating custom stencils. They’re tough enough to last through multiple projects but thin enough to cut cleanly. Pair these with a sharp hobby knife equipped with #11 blades - and here’s a pro tip from my years of design work: change those blades way more often than you think you need to. A dull blade fights you every step of the way.
Your workspace needs a self-healing cutting mat to protect both your table and your blade’s edge. Trust me, cutting on cardboard or newspaper will dull your knife faster than you can say “oops.” These mats are engineered with special materials that close up after being cut, providing a consistently smooth cutting surface that extends blade life significantly.
For actually applying your paint, you’ve got some great options. A mini foam roller gives you smooth, even coverage that’s perfect for larger areas like walls or canvas. For detailed work and adding texture, nothing beats a stencil brush with natural bristles - the slightly stiff bristles give you the control you need for that signature stippling technique.
Don’t forget painter’s tape for securing your stencils. It holds everything in place without leaving sticky residue or damaging your surface when you peel it off. And always have a drop cloth or newspaper ready - paint has a sneaky way of ending up where you least expect it.
Acrylic paint should be your go-to choice starting out. It dries quickly, cleans up with water, and works on almost any surface you can think of. For safety gear, invest in a proper respirator mask if you plan to use spray paints - your lungs will thank you later.
Here’s a detailed comparison of your main application methods:
| Application Method | Best For | Coverage | Control | Cleanup | Cost | Learning Curve |
|---|---|---|---|---|---|---|
| Foam Roller | Large areas, walls | Excellent | Medium | Easy | Low | Beginner |
| Stencil Brush | Details, texture | Good | Excellent | Medium | Medium | Intermediate |
| Cosmetic Sponge | Fabric, blending | Medium | Good | Easy | Very Low | Beginner |
| Spray Paint | Smooth finish | Excellent | Low | Difficult | Medium | Advanced |
Building Your Starter Kit (the Budget Way)
Before you head to the art store, take a look around your house. You’d be amazed at how many perfectly good stenciling tools are hiding in your junk drawer. Old credit cards make excellent paint scrapers for cleaning stencils. Paper plates work beautifully as disposable palettes - no cleanup required. Even clean rags and empty yogurt containers become essential tools for paint removal and brush cleaning.
Cardstock tests are your secret weapon for building confidence. Cut simple shapes from cardboard or heavy paper to practice your technique before tackling your real project. There’s something liberating about knowing you can experiment freely without worrying about ruining anything expensive. Many professional artists still use cardboard prototypes to test complex multi-layer designs before cutting expensive mylar stencils.
Creating sample boards takes this practice approach one step further. Paint a piece of cardboard with your intended base color, then test your stenciling technique on it. This lets you figure out the right amount of paint, the perfect pressure, and how your colors look together - all without the pressure of working on your final piece.
Repurposing household items extends far beyond basic tools. Old magazines provide excellent practice surfaces and color inspiration. Plastic lids from containers make perfect paint palettes that you can clean and reuse. Even worn-out clothing can become practice fabric for testing textile techniques. This approach not only saves money but also develops your problem-solving skills and resourcefulness as an artist.
Picking the Right Paint & Ink
Acrylics remain the champion choice for beginners, and for good reason. They dry quickly so you’re not waiting around forever, they clean up with plain water, and they stick to almost anything. For the best results, choose flat or matte finishes - they grab onto stencil paint much better than glossy surfaces that can cause your paint to slide around.
Planning to stencil on T-shirts or fabric? Fabric paint is worth the small extra investment. Regular acrylics will turn your soft shirt into cardboard, while fabric paints stay flexible after they dry and actually survive the washing machine. Heat-setting with an iron makes fabric paints permanent and washable, opening up endless possibilities for custom clothing and home textiles.
Spray cans offer that perfectly smooth coverage you see in professional work, but they require a bit more skill to control. If you’re drawn to spray paint, practice on cardboard first and always work in a well-ventilated area with proper respiratory protection. The results can be stunning, but respect the fumes. Professional-grade spray paints offer better coverage and color consistency than hardware store varieties, though they cost more initially.
For paper projects, dye inkpads create beautiful, rich colors with smooth blending effects. They work particularly well with cosmetic sponges to create soft, watercolor-like transitions that add a professional touch to greeting cards or art prints. Archival-quality inks ensure your paper projects won’t fade over time, making them suitable for gifts or artwork you want to preserve.
Stencil Art for Beginners: Step-by-Step Workflow
Getting crisp, professional results is less about talent and more about following a simple, repeatable routine. Use this streamlined 6-step checklist and you’ll avoid 90 % of the mistakes beginners make.
1. Pick the right design
• Bold, high-contrast shapes (geometrics, leaves, chunky lettering)
• If you can’t read it at arm’s length, save it for later
2. Secure the stencil
Tape every edge with painter’s tape and press down firmly. For curved items use several short strips so the template hugs the surface.
3. Offload, then dab
Load your brush or mini-roller, then blot almost dry on a paper towel. A nearly dry tool prevents paint from creeping under edges. Use the classic dry-brush dabbing technique—straight up-and-down taps, never side strokes.
4. Build thin layers
Two or three light passes give cleaner lines than one heavy coat. Let each pass become touch-dry (just a couple of minutes with acrylic) before adding more paint.
5. Lift & inspect
When the top layer looks matte—not shiny—carefully peel one corner and check. Minor gaps? Lay the stencil back down and dab again.
6. Quick clean-up
Rinse stencils in warm water straight away; a soft brush plus mild soap removes stubborn spots. Dry flat on a towel so they don’t warp.
Fixing Common Issues (fast)
• Paint bleed (wet): Blot with a baby wipe—don’t rub.
• Paint bleed (dry): Touch up with a tiny brush and your base colour.
• Mis-aligned second layer: Add registration marks (tiny crosses outside the artwork) before you start; they’re lifesavers.
Creating or Choosing Your First Design
Free printables, photo-to-stencil apps, or a friend’s craft cutter are all fair game. Just remember bridge planning—the middle of an “O” still needs to stay attached!
Master this short workflow and you’ll have the confidence to tackle multi-layer projects, fabrics, and even walls. Practice on scrap card first, then move on to that canvas or T-shirt you’ve been eyeing.
Beyond the Basics: Creative Surfaces & Project Ideas

Once you’ve gotten comfortable with the basics, stencil art for beginners opens up a whole world of creative possibilities. The beauty of this technique is that it works on almost any surface you can imagine - and each one brings its own exciting challenges and rewards.
Walls are probably the most dramatic change you can make with stenciling. That plain accent wall behind your bed? A few hours with a repeating stencil pattern can make it look like you installed expensive designer wallpaper. Most beginners can complete a weekend wall pattern project in about 14 hours, spread across two days. The key is choosing a design that’s forgiving - geometric patterns work beautifully because small alignment variations actually add to the handcrafted charm.
Canvas pieces let you create custom artwork that perfectly matches your space and style. There’s something incredibly satisfying about hanging a piece on your wall that you made with your own hands. These also make thoughtful gifts that show you put real time and care into creating something unique.
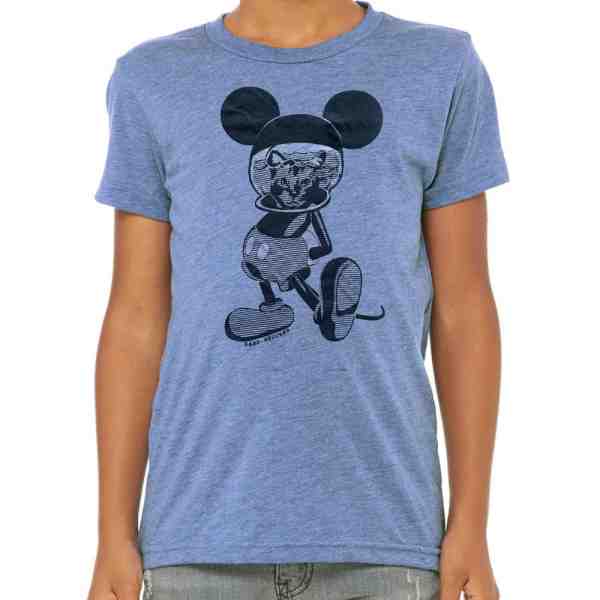
Moving into wearable art, T-shirts and apparel become your personal fashion statement. At Handshucked Designs here in Key West, we’ve incorporated stenciling techniques into our hand-printed apparel line. Our Lucky Cat series pieces show how stencil-inspired designs can create bold, graphic looks that stand out from mass-produced clothing.
Furniture flips might be one of the most rewarding projects you can tackle. That tired old dresser from a thrift store? A carefully chosen stencil pattern can transform it into a stunning focal point that looks like it came from an expensive boutique. The trick is choosing designs that complement the furniture’s style rather than fighting against it.
Floor tiles offer an unexpected canvas that can completely change a room’s personality. You can create the look of expensive decorative tiles for a fraction of the cost. This works especially well in bathrooms or kitchens where you want to add pattern without overwhelming the space.
For smaller projects, greeting cards become meaningful when you stencil your own designs. Combined with blendable markers, you can create watercolor-like effects that feel personal and handcrafted. These are perfect for testing new color combinations before committing to larger projects.
Tips for Corners, Edges & Textured Surfaces
Real-world surfaces don’t always cooperate like the smooth practice boards you started with, but that’s where stenciling gets really interesting. Each challenge teaches you something new about the craft.
The bend-and-tape method becomes your best friend when working around corners. Carefully bend your stencil to follow the angle, then use extra tape to maintain contact with both surfaces. It feels awkward at first, but you’ll quickly develop a feel for how much pressure the stencil can handle.
Cut-down mini-stencils solve the problem of tight spaces around light switches, outlets, or narrow areas where your full stencil just won’t fit. Simply trace the relevant portion of your design onto a smaller piece of mylar and cut it out. These mini versions often become some of your most useful tools.
Stippling on brick and other textured surfaces requires patience but creates amazing results. Use a stencil brush with very little paint and dab repeatedly to work the color into all the surface irregularities. The texture actually adds character to your finished design that you can’t get on smooth surfaces.
Cleaning & Caring for Reusable Stencils

Taking care of your stencils isn’t glamorous work, but it’s what separates beginners who stick with the craft from those who give up after a few projects. Quality mylar stencils can last for years with proper care, making them incredibly cost-effective tools.
A simple vinegar rinse works wonders for water-based paints. Mix equal parts water and vinegar, and you’ve got an effective cleaning solution that won’t damage your stencil material. The acid in the vinegar breaks down paint residue without the harsh chemicals found in commercial cleaners.
For stubborn paint buildup, use a soft brush scrub with an old toothbrush or soft-bristled brush. The key word here is gentle - you want to remove paint, not tear delicate stencil areas. Work in small circles and let the cleaning solution do most of the work.
Flat storage prevents the heartbreak of finding your favorite stencil warped and unusable. Store clean, dry stencils between sheets of wax paper or parchment paper. This prevents them from sticking together and keeps them perfectly flat for your next project.
The real longevity boosters are the habits you develop around stencil care. Clean them immediately after use while the paint is still wet. Handle them gently during projects - no yanking or forcing. Never fold or crease the material, even when you’re in a hurry to pack up. These small practices add up to stencils that stay usable project after project.
Frequently Asked Questions about Stencil Art
Starting your stencil art for beginners journey naturally brings up questions, and honestly, we’ve all been there. Here are the most common challenges new stencilers face, along with practical solutions that actually work.
How do I fix a paint bleed or smudge?
Don’t panic - paint bleeds happen to everyone, even experienced artists. The key is knowing how to fix them quickly and effectively.
If you catch the bleed while it’s still wet, grab a baby wipe and gently blot the excess paint. Don’t rub or scrub, just press down and lift. This technique works surprisingly well for lifting wet paint without spreading it further.
For dried mistakes, the dab base-color brush method is your best friend. Once the bleed is completely dry, use a small brush loaded with your background color to carefully paint over the mistake. This creates a clean slate where you can re-stencil if needed.
Micro-touch-ups handle those tiny imperfections that bug you but aren’t worth redoing the whole section. A fine-tip brush or even a cotton swab dipped in the right color can fix small gaps or rough edges. Handmade art isn’t supposed to be machine-perfect - small variations add character.
What safety gear do I really need?
Safety might not be the most exciting part of stenciling, but it’s definitely important, especially as you start experimenting with different materials and techniques.
A proper respirator is essential when using spray paints or working indoors. Those little dust masks won’t cut it for paint fumes - you need something designed for vapors. Trust me, your lungs will thank you later.
Gloves protect your hands from both paint stains and harsh chemicals. This becomes especially important when you start using spray adhesives or cleaning solvents. Plus, cleanup is much easier when you’re not scrubbing paint off your fingernails.
Eye protection matters more than you might think, particularly with spray applications. Paint splatter has a way of finding your eyes when you least expect it. Simple safety glasses do the job perfectly.
Your ventilation checklist should include working near open windows or doors, using fans to move air around, and taking regular breaks when working with aerosols. Fresh air isn’t just nice - it’s necessary for safe stenciling.
Where can I find beginner-friendly stencil designs?
Finding good starter designs can feel overwhelming with so many options available, but there are some reliable places to start your search.
Free libraries are hidden gems for crafters. Many have extensive craft sections with stencil patterns you can photocopy and use. Librarians are often crafters themselves and can point you toward the best resources.
Craft stores let you see and touch stencils before buying, which helps you understand quality differences. The staff usually knows their products well and can recommend designs that work best for beginners. Plus, you can often find sales and clearance items that make starting even more affordable.
DIY cutters like electronic cutting machines open up unlimited possibilities once you’re ready to create custom designs. You can turn any simple image into a stencil, though you’ll want to master basic techniques first.
Online marketplaces offer huge selections of both physical stencils and digital files. The variety can be overwhelming, but reading reviews helps you find quality options that other beginners have had success with.
Conclusion & Next Creative Steps
You now have a starter toolkit, a proven 6-step workflow, and a handful of project ideas—all you need to turn blank surfaces into personal statements. Stenciling is budget-friendly, fast to learn, and endlessly adaptable, which is why we use it daily at Handshucked Designs in Key West to create pieces like our “Hungry Manatee” and “Lost Cat” series.
Keep the momentum going with these mini-goals:
- Daily 15-minute practice. One scrap board, one colour—build muscle memory.
- Try a second colour. Layer it over your favourite design and see how the image pops.
- Show the world. Post your next piece online or gift a stenciled card. Community feedback accelerates growth.
When you’re ready for bigger challenges, experiment with walls, furniture flips, or fabric printing. Your stenciling skills transfer smoothly to all of them.
For inspiration—or to see how far this craft can go—visit our gallery at Handshucked: https://handshucked.com/store/section/art. We can’t wait to see what you create.
Happy stenciling from all of us at Handshucked Designs!