Picture Perfect Stencils: Transform Your Photos into Art
Transform Any Photo into Eye-Catching Stencil Art
Turning your favorite snapshots into bold, graphic stencil designs isn’t rocket science – it’s actually much simpler than most people think. I’ve spent years perfecting these techniques, and I’m excited to share them with you!
How to make stencil art from photo techniques follow a straightforward process that anyone can master with a little practice. The magic begins with selecting a high-contrast photo where your subject really pops against the background. Next, you’ll process this image using software or online tools to create that distinctive two-tone look that defines stencil art. Once you’ve got your basic design, you’ll need to clean it up by making sure all parts connect properly (those connections are called “bridges” in stencil lingo). Then it’s time to print and cut your creation on appropriate material, before finally applying it using spray paint or other artistic mediums.
What I love about stencil art is how versatile it is – you can use these designs for street art that catches the eye, custom apparel that stands out from the crowd, unique home décor pieces, or just personal creative projects that express your style. The beauty of the whole process lies in its accessibility. Whether you’ve got professional software like Photoshop, are working with free alternatives like GIMP, or prefer using specialized online stencil generators, the fundamental principles remain the same.
I’m Chris Higgins, and my journey with how to make stencil art from photo techniques spans over a decade of creating commercial designs and developing my personal artistic voice. Throughout my career, I’ve refined methods that blend bold illustration with elements of graffiti and pop art to create designs that are both dynamic and neatly simplified. There’s something incredibly satisfying about stripping an image down to its essential elements and watching it transform into something new and powerful.
Living in Key West has definitely influenced my artistic style – there’s something about the laid-back island vibe that encourages experimentation and a certain playful approach to creativity. I’ve found that the best stencil art captures that same spirit – bold enough to make a statement, but with a certain carefree quality that makes people smile.
Human-focused design is at the heart of what makes a great stencil. After all, we’re not just processing pixels – we’re creating art that connects with people and tells a story in an instant. That’s the real power behind learning how to make stencil art from photo techniques – turning ordinary moments into extraordinary visual statements.
Stencil art is like magic for artists - it’s the art of creating templates with cut-out designs that let you apply paint selectively to create bold, graphic images. Think of it as a mask that decides where color goes and where it doesn’t.
Stencil Art 101 & Photo Selection
What Is Stencil Art?
This technique has a rich history in street art culture (those vibrant murals you’ve seen on urban walls), but it’s grown into something much more versatile. Today, you’ll find stencil art everywhere from gallery walls to custom t-shirts to home décor projects.
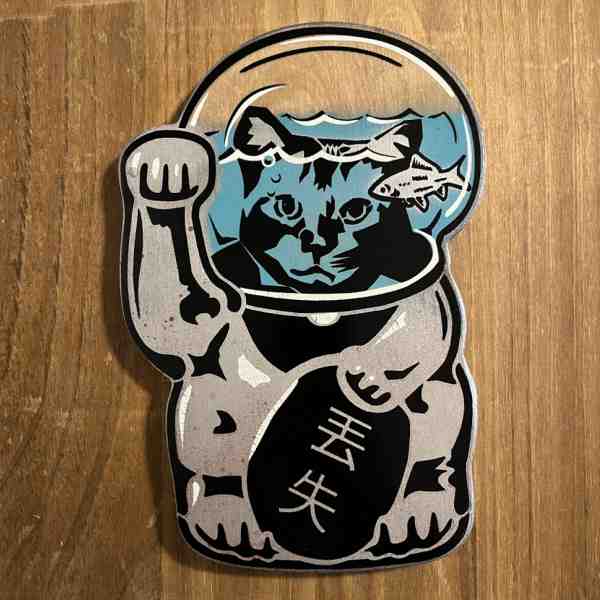
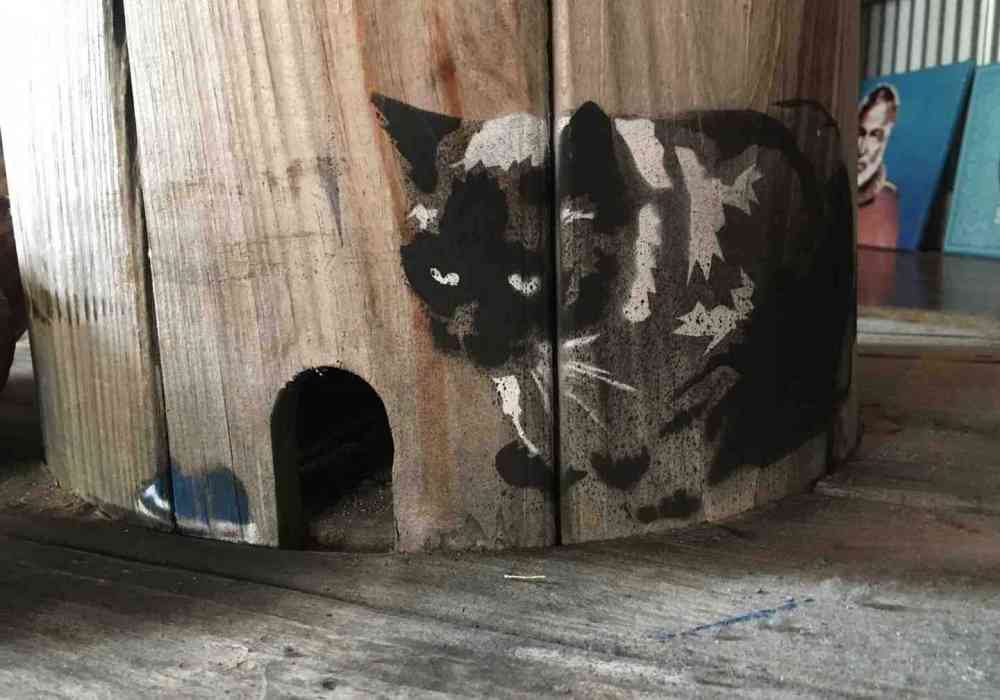
Here in Key West, stencil art speaks our language. Our sun-drenched streets come alive with high-contrast designs that capture the island’s quirky spirit. Our own “Lost Cat” series and “Hungry Manatee” designs use this technique to create artwork that’s both reproducible and instantly recognizable against our colorful tropical backdrop.
The beauty of stencil art? You can recreate your design multiple times with consistent results - perfect for creating a series or printing on different surfaces.
Not every photo is stencil-ready. When selecting an image to transform with how to make stencil art from photo techniques, look for these qualities:
Picking the Perfect Photo
Strong contrast is your best friend. Photos with clear differences between light and dark areas translate beautifully to the binary world of stencils.
Recognizable silhouettes work wonders. Think of iconic profiles or distinctive shapes that remain identifiable even when simplified.
Simple backgrounds prevent confusion. A busy background competes with your subject and creates cutting nightmares later.
Limited fine details ensure success. Intricate elements often get lost or become impossible to cut cleanly.
A smart trick before committing to a photo: view it in grayscale. This preview instantly shows you how your image will look stripped down to light and dark values. Photos with distinct separation between elements will make the most striking stencils.
Faces, pets, and iconic objects tend to make fantastic stencil subjects. Our brains are wired to recognize these shapes even when they’re reduced to their essential forms.
As you choose your photo, consider whether you want a single-layer or multi-layer stencil. Single-layer designs are perfect for beginners - they’re faster to create and cut, though limited to one color. Multi-layer stencils require more planning but reward you with additional colors and richer detail.
| Good Source Photos | Poor Source Photos |
|---|---|
| High contrast portraits | Low contrast, foggy scenes |
| Silhouettes against light backgrounds | Busy, cluttered backgrounds |
| Simple, iconic objects | Complex patterns or textures |
| Clear facial features | Too many fine details |
| Bold graphic elements | Gradual tone transitions |
Remember to think about “bridges” and “islands” in your design. Bridges are the thin connections that keep parts of your stencil physically attached to the whole sheet. Without proper bridges, you’ll end up with floating pieces (islands) that fall out when you lift your stencil - like the center of an “O” without support.
The perfect stencil photo balances simplicity with impact - something that remains powerful even when reduced to its most essential elements.
Turning your favorite photo into a stencil doesn’t have to be complicated. Whether you’re tech-savvy or prefer hands-on crafting, there’s a method that’ll work perfectly for you. I’ve spent years refining these techniques, and I’m excited to share what really works!
Photoshop gives you incredible control over your stencil creation. Here’s my tried-and-true process that we use for many of our Street Art projects:
A wise stencil artist once told me, “The simplest line that communicates the image is the best!” This philosophy guides everything we create at Handshucked Designs, especially our street art pieces that need to make an immediate impact.
No Photoshop? No problem! There are fantastic free tools online that can transform your photos into stencil-ready designs:
How to Make Stencil Art from Photo: Step-by-Step Methods
How to Make Stencil Art from Photo in Photoshop
- Open your image in Photoshop and crop it to focus on what matters most.
- Pump up that contrast! Use Image > Adjustments > Brightness/Contrast to make those lights lighter and darks darker.
- Apply the Threshold adjustment (Image > Adjustments > Threshold). This magical little slider transforms your photo into pure black and white. Play with it until you see your subject clearly defined.
- Clean up time! Use the Brush tool with white to erase distracting details and black to fill in areas that should be solid.
- Connect those islands! This step is absolutely crucial – any isolated white areas need thin bridges connecting them to the rest of the design, or they’ll simply fall out when you cut your stencil.
- Simplify with the Cutout filter (Filter > Filter Gallery > Artistic > Cutout). This smooths those jagged edges and makes your stencil much easier to cut.
- Take a good look at your design. Is it still recognizable? Are all areas properly connected? Make any final refinements now.
- Print your masterpiece on heavy cardstock or export it for cutting.
How to Make Stencil Art from Photo with Free Online Tools
The Free Picture Stencil Maker has earned a perfect 5/5 user rating for good reason – it’s incredibly user-friendly and requires no account creation. Simply upload your photo, adjust the edge detection and threshold settings with intuitive sliders, preview your creation, and download your finished stencil. The instant results make this perfect for beginners or quick projects. You can find it at Rapid Resizer.
Other excellent options include Stencil Creator and the Fx Stencil app for mobile users. These tools automate much of the technical work while still giving you creative control over the final result.
Down here in Key West, many of our artists start with these tools before adding their personal touches. They’re especially handy when creating initial drafts of our popular “Lost Cat” series designs.
There’s something deeply satisfying about creating stencils by hand. This traditional approach gives your work a unique, organic quality that digital methods sometimes miss:
Hand-Tracing & Analog Hacks
Print your photo at your desired size, then trace the main outlines with a black fineliner. This is where the magic happens – as you trace, you naturally simplify the image, keeping only what’s essential. No computer algorithm can replicate your artistic judgment!
No printer? Use a sunny window or your laptop screen as a light source. Place your photo on the screen and your stencil material on top, then trace away.
Quick tip: If you’re working on a complex image, use a light pad for more comfortable tracing. Your eyes will thank you!
“I’ve been hand-tracing stencils for over a decade,” one of our Handshucked artists shared with me last week. “There’s something deeply satisfying about manually simplifying an image. I often find creative solutions that automated processes would never find.”
Whether you’re creating a simple one-layer stencil or planning an elaborate multi-color piece, these methods will help you transform your photos into striking stencil art. The techniques we use for our “Hungry Manatee” series started with these exact same steps!
Photoshop & Free Tool Deep-Dive
Let’s roll up our sleeves and dive into the nitty-gritty of digital stencil creation. Don’t worry—I’ll guide you through the technical stuff with the same careful attention we give to our Key West-inspired designs.
When I’m working with Photoshop’s Threshold adjustment, I’ve found that the sweet spot often hovers around the 100 mark—though this varies with every photo. Think of the Threshold slider as your artistic decision-maker: slide it left, and your stencil becomes darker with more details; slide right, and you’ll get a cleaner, more minimal look.
Photoshop Settings for Perfect Stencils
For that professional finish, try applying a Gaussian Blur before your final Threshold adjustment. A radius of about 4 pixels works wonders for smoothing those jagged edges that can be a nightmare to cut later. Your fingers will thank you!
When playing with the Cutout filter, start with these settings: 2 levels for a classic black-and-white stencil, Edge Simplicity around 4-6 (higher for smoother lines), and Edge Fidelity at 1-2 to maintain the essence of your original image while making it stencil-friendly.
One trick we love at Handshucked is using layer masks instead of permanently altering your image. This lets you paint back details that might have been lost in the threshold process—perfect for rescuing those signature details that make our “Lost Cat” series so recognizable.
Not everyone wants to dive into Photoshop, and that’s perfectly fine! Online stencil generators offer surprisingly powerful options:
Online Tool Settings
The Edges slider is your best friend here—it controls how faithfully the tool traces the contours in your photo. For beginners, I recommend starting with a middle setting and adjusting from there.
The Threshold setting works similarly to Photoshop’s version, determining where the cutoff happens between black and white. When working with portraits, try a slightly lower threshold to preserve facial features.
Look for tools with Adaptive Color options—these smart algorithms help maintain important details while simplifying areas that would be too fiddly to cut. It’s like having a digital assistant who understands what makes a good stencil.
The Sharp/Soft adjustment is crucial—too sharp, and you’ll be cursing while cutting tiny details; too soft, and your image loses definition. For most projects, a slight lean toward the softer side makes cutting easier without sacrificing the image’s integrity.
Single-layer stencils are like the gateway drug to stencil art—quick to create, straightforward to cut, and immediately satisfying. They’re perfect for bold images where a silhouette tells the whole story.
Single-Layer vs Multi-Layer Decisions
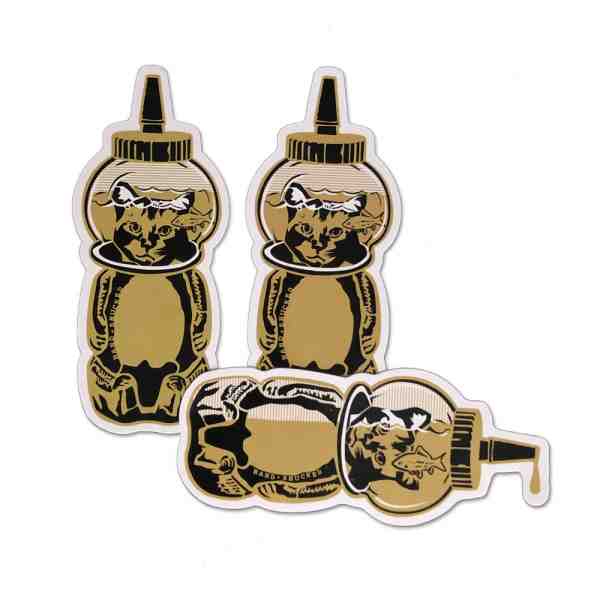
Multi-layer stencils, on the other hand, let you introduce color and complexity. When we created our “WTFishbowl” series, we used up to 5 colors to capture those vintage toy vibes that have become a Handshucked signature.
The secret to successful multi-layer stencils is proper registration—that’s fancy talk for making sure your layers line up perfectly. Adding small registration marks (little crosses or circles) in the corners of each stencil layer creates alignment guides. Think of them as the GPS coordinates for your spray paint journey.
Always plan your spray order from lightest to darkest colors—this prevents darker colors from showing through lighter ones and keeps your final image crisp and clean.
A beautiful digital stencil means nothing if it falls apart in your hands. Bridges are the unsung heroes of stencil design—these thin connections (about 1/8” to 1/4” wide) keep isolated areas attached to the main stencil.
Ensuring Cuttable, Structurally Sound Designs
Island prevention is crucial—any black area completely surrounded by white is an “island” that will fall out when cut. Make sure every part of your stencil remains connected to the whole.
Edge simplification might feel like you’re compromising your artistic vision, but overly complex edges are just asking for trouble. When I’m designing a new piece for our “Hungry Manatee” collection, I always remind myself that slight simplification often improves the bold, graphic quality that makes stencil art so striking.
Before sending your design to print, do a quick physical stability check. Imagine cutting along each line and ask yourself: “Will this hold together as one piece?” This mental exercise has saved me countless headaches and ruined stencils.
As one of our veteran stencil artists loves to say, “Digital perfection meets physical reality at the cutting mat.” No matter how precisely you plan in Photoshop, the x-acto knife has the final say. Accept this reality, and you’ll create stencils that are both beautiful and functional.
From Screen to Wall: Cutting, Painting, Troubleshooting & Safety
The moment has arrived to transform your digital creation into tangible art. This is where the magic really happens—when your carefully designed stencil meets the physical world.
The material you choose can make or break your stencil project. Each has its own personality and purpose:
Materials for Stencil Creation
Cardstock (65-110 lb) is your budget-friendly friend—perfect for beginners or one-off projects. It’s easy to cut but won’t stand up to repeated use.
Mylar sheets (3-7 mil) are what we reach for at Handshucked when creating our “Lost Cat” series. These flexible, durable sheets can be cleaned and reused dozens of times, making them ideal for our hand-printed apparel line. The 5 mil thickness hits that sweet spot between flexibility and durability.
Acetate or transparency sheets offer visibility that helps with precise positioning. You can see exactly where your design will land—a huge advantage when working on detailed pieces.
Stencil film is the professional’s choice. It’s specifically designed for stencil work, with just the right amount of rigidity and durability.
Here in humid Key West, we’ve learned that mylar holds up better than cardstock, which can warp with moisture. This might not be an issue in drier climates, but it’s something to consider.
Cutting is where patience truly becomes a virtue. I still remember my first attempt—rushing through and ruining hours of design work in minutes. Learn from my mistakes!
Cutting Your Stencil
Start by securing your material to a self-healing cutting mat. This protects both your work surface and ensures cleaner cuts. A fresh, sharp X-ACTO knife is non-negotiable—dull blades lead to tears and frustration.
Begin cutting from the center of your design, particularly with important details like eyes or facial features, then work your way outward. This approach helps maintain the structural integrity of your stencil as you cut.
“I always tell newcomers to make short, deliberate cuts rather than trying to slice through long lines in one go,” shares one of our Handshucked artists. “It’s like meditation—slow, intentional movements produce the best results.”
For intricate details, don’t hesitate to rotate your cutting mat rather than contorting your hand into uncomfortable positions. Your wrists will thank you later.
Positioning is everything when it comes to applying your stencil. Once it’s perfectly placed, secure it with low-tack spray adhesive (our preferred method), painter’s tape around the edges, or weights if you’re working on a flat surface.
Painting with Your Stencil
When spraying, less is more. Hold your spray can about 6-12 inches away and apply light, even coats with quick, sweeping motions. The most common rookie mistake we see is spraying too much paint, which bleeds under the edges and ruins those crisp lines you worked so hard to create.
“The perfect spray technique feels like you’re barely misting the surface,” notes our lead artist. “Build up layers gradually—you can always add more, but you can’t take it away.”
For multi-layer stencils, patience becomes doubly important. Allow each layer to dry completely before applying the next, and use those registration marks you hopefully included to ensure perfect alignment.
Remember to remove your stencil immediately after painting to prevent it from bonding with your artwork—a lesson I learned the hard way during a humid Key West summer!
Even experienced artists encounter challenges. Here’s how we handle the most common stencil snags:
Troubleshooting Common Issues
Bleeding edges can ruin an otherwise perfect piece. Combat this by using less paint, increasing your spray distance, or applying a very light coat of spray adhesive to the back of your stencil.
Stencil sticking to your surface is frustrating but preventable. Remove the stencil promptly after painting and use minimal adhesive—just enough to prevent movement.
Misaligned layers in multi-color works can be avoided with proper registration marks and alignment pins. We sometimes use small pieces of tape folded into loops as temporary positioning aids.
Tearing during cutting usually means it’s time for a fresh blade or that you’re applying too much pressure. Let the sharpness of the blade do the work, not force.
Jagged edges often result from trying to cut too quickly. Slow, steady movements produce smoother lines every time.
Creating stencil art from photos shouldn’t come at the cost of your health. Always work in a well-ventilated area—preferably outdoors or near an open window with a fan. A proper respirator mask rated for paint fumes is essential, not optional, especially when using spray paint.
Safety Considerations
Protect your hands with cut-resistant gloves when working with X-ACTO knives. Those blades are deceptively sharp, and a slip can result in a serious injury. Store cutting tools safely away from children and pets.
Don’t underestimate the importance of proper ventilation. Even in our open-air Key West studio, we take extra precautions with ventilation fans and masks. Your lungs will thank you years down the road.
Before sharing or selling your stencil art from photo creations, take a moment to consider copyright implications:
Copyright Considerations
Using your own photographs is always the safest route legally and ethically. If you’re using someone else’s images, obtaining explicit permission is the professional approach.
For personal, non-commercial projects, fair use may apply, but the boundaries are often blurry. When your work becomes transformative—substantially changing or reinterpreting the original—you have stronger legal footing, but consulting a legal professional is wise for commercial applications.
At Handshucked Designs, we’ve built our reputation on ethical practices, including proper licensing and original artwork. This approach has not only kept us legally sound but has also strengthened relationships with collaborators and customers who appreciate our integrity.
For more inspiration and tips, check out our Blog where we regularly share behind-the-scenes insights into our creative process.
Absolutely! You don’t need expensive software to create stunning multi-color stencil art. Many online stencil generators have built-in tools for creating layered designs. The Stencilizr tool, for instance, offers color scheme generators that suggest complementary or monochromatic palettes—perfect if you’re not confident in your color selection skills.
Frequently Asked Questions about How to Make Stencil Art from Photo
Can I create multi-color stencils without Photoshop?
If you prefer a more hands-on approach, you can manually create separate stencils for different tonal ranges in your photo. Think of it like separating your image into light, medium, and dark areas, with each becoming its own stencil layer.
Free software like GIMP works wonderfully for this purpose too. While the interface might feel different from Photoshop, the core functionality for creating layered stencils is there—and you can’t beat the price!
One of our Key West artists started creating multi-layered stencils using nothing but printed photos and different colored highlighters to mark each layer before cutting. Sometimes the simplest approaches yield the most creative results!
This is one of the most common frustrations when making stencil art from photos, but there’s a simple solution: bridging. Those tiny islands of detail need to connect to the main body of your stencil with thin bridges—think of them as little support beams holding everything together.
How do I stop tiny pieces from falling out when cutting?
For cardstock stencils, make your bridges about 1/8” to 1/4” wide. Too thin, and they’ll tear; too thick, and they’ll be visibly distracting in your final art.
Sometimes the best approach is to simplify problematic areas altogether. Ask yourself: “Does this tiny detail actually contribute to recognizing the image?” Often, eliminating fussy bits creates a stronger, more graphic design anyway.
“You have to keep the image as simple as possible to avoid floating blobs that won’t be connected,” as one of our experienced stencil artists puts it. This principle guides many of our designs at Handshucked, especially in our popular “Lost Cat” series where simplicity creates that immediate visual punch.
In short—no. Those amazing images you find online are someone’s creative work and are typically protected by copyright. Here at Handshucked, we take image rights seriously for both ethical and legal reasons.
Is it legal to use any photograph I find online?
Your safest options are:
Use your own photographs that you’ve taken yourself. These personal images often have the most meaning anyway, and you’ll never have to worry about permissions.
Purchase properly licensed stock photos for your projects. Many affordable stock sites offer images specifically for artistic adaptation.
Explore Creative Commons or public domain resources if you need free images. Just be sure to check the specific license requirements—some may require attribution or limit commercial use.
While changing a photo into stencil art does change it significantly, this change alone doesn’t guarantee protection from copyright issues, especially for commercial work.
For our commercial designs at Handshucked, we either create original photography or purchase proper licenses. This approach has allowed us to build our brand with integrity while developing our distinctive artistic style that captures the vibrant spirit of Key West.
Changing photos into stencil art open ups a world of creative expression that’s both accessible and rewarding. Whether you’re brightening up your living space, designing custom t-shirts, or exploring street art, the techniques we’ve covered will help you turn almost any photograph into a bold, graphic statement piece.
Conclusion
The beauty of stencil art lies in its emphasis on simplification and contrast. Don’t be afraid to experiment! Some of our most popular designs at Handshucked started as happy accidents or unexpected interpretations of source images. That blurry vacation photo might become your most striking piece of wall art when converted to a high-contrast stencil.
How to make stencil art from photo is as much about what you leave out as what you include. The process of simplification forces you to identify what truly matters in an image – the essential lines and shapes that communicate your subject’s essence.
Here in Key West, our street-art roots continue to influence everything we create at Handshucked Designs. The techniques we’ve shared throughout this guide have helped us develop our distinctive “Lost Cat” series and those playful “Hungry Manatee” designs that capture the quirky, colorful spirit of our island home.
We’d absolutely love to see what you create using these techniques! The most rewarding part of sharing our process is seeing how others adapt and evolve these methods to express their own unique vision. Share your stencil art projects on social media or drop by our Blog for more inspiration and tutorials.
And if you’re curious about how these stencil techniques translate into finished artwork, our Art collection showcases plenty of examples that might spark your next creative project.
The real magic of stencil art is that it democratizes creativity – with just a meaningful photo, some basic tools, and a little patience, anyone can create striking designs that make powerful visual statements. So grab that X-acto knife, find a photo that speaks to you, and start cutting your way to something amazing. Happy stenciling!